Surface Flinger
什么是SurfaceFlinger? SurfaceFlinger 接受图像的缓冲,对它们进行合成,然后发送到屏幕。
SurfaceFlinger 可通过两种方式接受缓冲区:通过 BufferQueue 和 SurfaceControl,或通过 ASurfaceControl。
虽然应用可以随时提交缓冲区,但 SurfaceFlinger 仅能在屏幕处于两次刷新之间时唤醒,以接受缓冲区,这会因设备而异。这样可以最大限度地减少内存使用量,并避免屏幕上出现可见的撕裂现象。
在屏幕处于两次刷新之间时,屏幕会向 SurfaceFlinger 发送 VSYNC 信号。VSYNC 信号表明可对屏幕进行刷新而不会产生撕裂。当 SurfaceFlinger 接收到 VSYNC 信号后,SurfaceFlinger 会遍历其层列表,以查找新的缓冲区。如果 SurfaceFlinger 找到新的缓冲区,SurfaceFlinger 会获取缓冲区;否则,SurfaceFlinger 会继续使用上一次获取的那个缓冲区。SurfaceFlinger 必须始终显示内容,因此它会保留一个缓冲区。如果在某个层上没有提交缓冲区,则该层会被忽略。
SurfaceFlinger 在收集可见层的所有缓冲区之后,便会询问硬件混合渲染器 (HWC) 应如何进行合成。如果 HWC 将层合成类型标记为客户端合成,则 SurfaceFlinger 将合成这些层。然后,SurfaceFlinger 会将输出缓冲区传递给 HWC。
SurfaceFlinger怎么启动
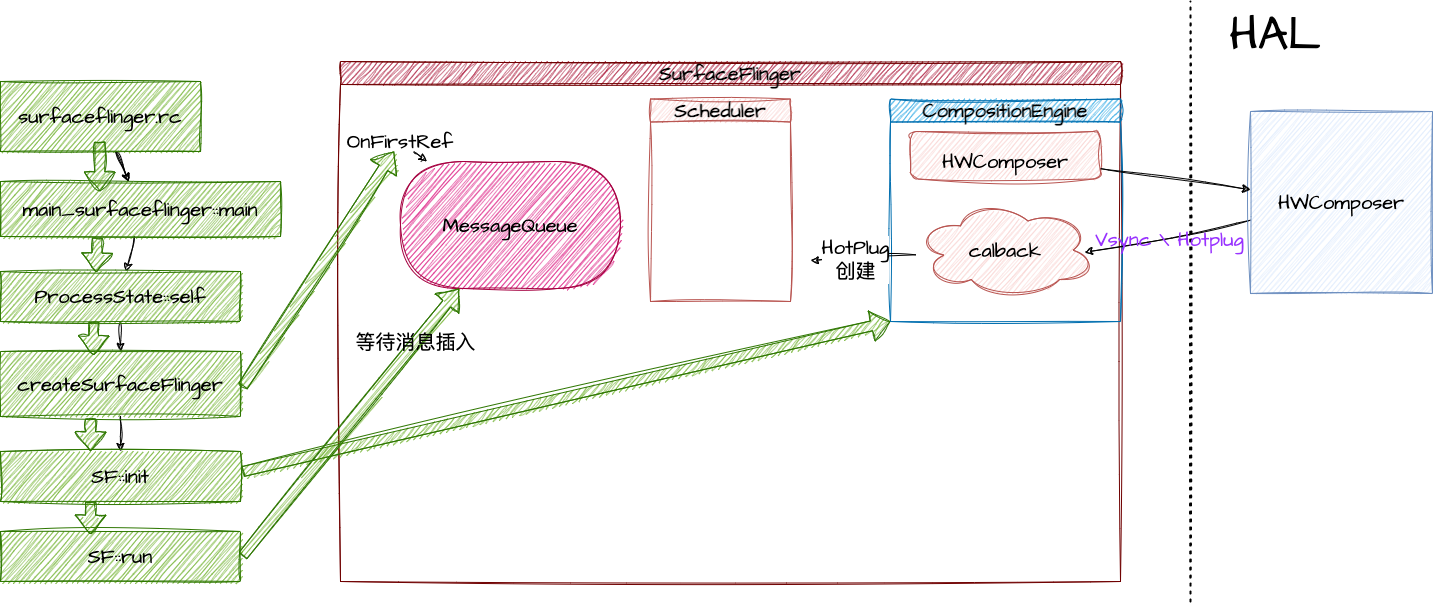
由init进程通过解析surfaceflinger.rc文件,启动surfacefligner /system/bin/surfaceflinger 进程。main_surfaceflinger.cpp 就是这个进程的入口
 1
 2
 3
 4
 5
 6
 7
 8
 9
10
11
12
13
14
15
16
17
18
19
20
21
22
23
24
25
26
27
28
29
| // frameworks/native/services/surfaceflinger/main_surfaceflinger.cpp
int main(int, char**) {
// 当SF启动的时候,限制binder线程池上限为4。
ProcessState::self()->setThreadPoolMaxThreadCount(4);
// 启动Binder服务端
sp<ProcessState> ps(ProcessState::self());
ps->startThreadPool();
// 实例化 surfaceflinger
sp<SurfaceFlinger> flinger = surfaceflinger::createSurfaceFlinger();
// 初始化
flinger->init();
// publish 到 ServiceManager
sp<IServiceManager> sm(defaultServiceManager());
sm->addService(String16(SurfaceFlinger::getServiceName()), flinger, false,
IServiceManager::DUMP_FLAG_PRIORITY_CRITICAL | IServiceManager::DUMP_FLAG_PROTO);
// 启动显示器服务
startDisplayService(); // dependency on SF getting registered above
// 进入SurfaceFlinger的主循环
flinger->run();
return 0;
}
|
SurfaceFlinger的 servicename是 “SurfaceFlinger”,对应的binder对象是 android.ui.ISurfaceComposer
SurfaceFlinger的定义
SurfaceFlinger.h
1
2
3
4
5
| class SurfaceFlinger : public BnSurfaceComposer,
public PriorityDumper,
private IBinder::DeathRecipient,
private HWC2::ComposerCallback,
private ISchedulerCallback {
|
BnSurfaceComposer surfaceComposer的binder服务端。PriorityDumper 用于dump信息。DeathRecipient binder服务端挂掉之后,用于通知客户端。HWC2::ComposerCallback 注册了HWC2的composercallback的回调,可以用于监听来自HWC2的事件,比如VSync事件。ISchedulerCallback 设置一些Scheduler 用于vsync相关的callback
 1
 2
 3
 4
 5
 6
 7
 8
 9
10
11
| struct ISchedulerCallback {
virtual void setVsyncEnabled(bool) = 0;
virtual void changeRefreshRate(const scheduler::RefreshRateConfigs::RefreshRate&,
scheduler::RefreshRateConfigEvent) = 0;
virtual void repaintEverythingForHWC() = 0;
virtual void kernelTimerChanged(bool expired) = 0;
virtual void triggerOnFrameRateOverridesChanged() = 0;
protected:
~ISchedulerCallback() = default;
};
|
 1
 2
 3
 4
 5
 6
 7
 8
 9
10
11
12
13
| // frameworks/native/services/surfaceflinger/SurfaceFlingerFactory.cpp
sp<SurfaceFlinger> createSurfaceFlinger() {
// /frameworks/native/services/surfaceflinger/SurfaceFlingerDefaultFactory.cpp
// 提供了默认的创建各种实例的工厂方法
static DefaultFactory factory;
return new SurfaceFlinger(factory);
}
// frameworks/native/services/surfaceflinger/SurfaceFlinger.cpp
SurfaceFlinger::SurfaceFlinger(Factory& factory) : SurfaceFlinger(factory, SkipInitialization) {
ALOGI("SurfaceFlinger is starting");
// 主要是配置一些属性,此处与主流程无关,跳过。
}
|
主要是配置一些属性,具体感兴趣可以查看这篇文章。
初始化
 1
 2
 3
 4
 5
 6
 7
 8
 9
10
11
12
13
14
15
16
17
18
19
20
21
22
23
24
25
26
27
28
29
30
31
32
33
34
35
36
37
38
39
40
41
42
43
44
45
| void SurfaceFlinger::init() {
Mutex::Autolock _l(mStateLock);
// 设置渲染引擎
mCompositionEngine->setRenderEngine(renderengine::RenderEngine::create(
renderengine::RenderEngineCreationArgs::Builder()
.setPixelFormat(static_cast<int32_t>(defaultCompositionPixelFormat))
.setImageCacheSize(maxFrameBufferAcquiredBuffers)
.setUseColorManagerment(useColorManagement)
.setEnableProtectedContext(enable_protected_contents(false))
.setPrecacheToneMapperShaderOnly(false)
.setSupportsBackgroundBlur(mSupportsBlur)
.setContextPriority(
useContextPriority
? renderengine::RenderEngine::ContextPriority::REALTIME
: renderengine::RenderEngine::ContextPriority::MEDIUM)
.build()));
// 创建和 hwc hal层的接口
mCompositionEngine->setHwComposer(getFactory().createHWComposer(mHwcServiceName));
// 将sf设置成hwc的回调方法,接收hwc传过来的VSYNC等信号
mCompositionEngine->getHwComposer().setCallback(this);
// 处理 任何初始热插拔和显示更改的结果。
// 在注册hwcomposer的callback之后,如果有显示设备将会立刻收到一个热插拔事件。而在这里将会调用initScheduler
processDisplayHotplugEventsLocked();
// 初始化Display信息
initializeDisplays();
const bool presentFenceReliable =
!getHwComposer().hasCapability(Capability::PRESENT_FENCE_IS_NOT_RELIABLE);
mStartPropertySetThread = getFactory().createStartPropertySetThread(presentFenceReliable);
// 启动属性设置线程,这里面包含了启动开机动画的逻辑
if (mStartPropertySetThread->Start() != NO_ERROR) {
ALOGE("Run StartPropertySetThread failed!");
}
ALOGV("Done initializing");
}
void SurfaceFlinger::onFirstRef() {
// 初始化 messagequeue
mEventQueue->init(this);
}
|
在这一步中,SF主要做了以下几件事
- 配置及创建渲染引擎,用于GPU合成模式。(SF,在渲染多层layer的时候可能会将合并工作交给HWC去实现,但是会有一部分工作由SF自己来做,此处的渲染引擎就是用来做这个的)
- 创建HWComposer注册回调接口,用于接收VSync,hotplug等信号。
- 处理显示器的热插拔等事件。
- 初始化显示设备。
- 开始一个属性设置线程。这里面会启动开机动画。
mCompositionEngine->getHwComposer().setCallback(*this);
在这里注册了回调时,hwc将会立刻回调热插拔的状态。而这一步也将导致后续调用到 processDisplayHotplugEventsLocked。这一步将会一直走到 processDisplayAdded。
processDisplayHotplugEventsLocked
 1
 2
 3
 4
 5
 6
 7
 8
 9
10
11
12
13
14
15
16
17
18
19
20
21
22
23
24
25
26
27
28
29
30
31
32
33
34
35
36
37
38
39
40
41
42
43
44
45
46
47
48
49
50
51
52
53
54
55
56
57
58
59
60
61
62
63
64
65
66
67
68
69
70
71
72
73
74
75
76
77
78
79
80
81
82
83
84
85
86
87
88
89
90
| void SurfaceFlinger::processDisplayHotplugEventsLocked() {
for (const auto& event : mPendingHotplugEvents) {
std::optional<DisplayIdentificationInfo> info =
getHwComposer().onHotplug(event.hwcDisplayId, event.connection);
if (event.connection == hal::Connection::CONNECTED) {
if (it == mPhysicalDisplayTokens.end()) {
sp<IBinder> token = new BBinder();
mCurrentState.displays.add(token, state);
mPhysicalDisplayTokens.emplace(displayId, std::move(token));
// scheduler 管理Vsync的类
if (event.hwcDisplayId == getHwComposer().getInternalHwcDisplayId()) {
initScheduler(state);
}
mInterceptor->saveDisplayCreation(state);
}
}
// 配置display
processDisplayChangesLocked();
}
}
void SurfaceFlinger::processDisplayChangesLocked() {
。。。
if (!curr.isIdenticalTo(draw)) {
for (size_t i = 0; i < curr.size(); i++) {
const wp<IBinder>& displayToken = curr.keyAt(i);
if (draw.indexOfKey(displayToken) < 0) {
// 如果没有添加过display,在这里配置 display
processDisplayAdded(displayToken, curr[i]);
}
}
}
}
void SurfaceFlinger::processDisplayAdded(const wp<IBinder>& displayToken,
const DisplayDeviceState& state) {
compositionengine::DisplayCreationArgsBuilder builder;
if (const auto& physical = state.physical) {
builder.setId(physical->id);
builder.setConnectionType(physical->type);
} else {
builder.setId(acquireVirtualDisplay(resolution, pixelFormat, state.layerStack));
}
builder.setPixels(resolution);
builder.setIsSecure(state.isSecure);
builder.setLayerStackId(state.layerStack);
builder.setPowerAdvisor(&mPowerAdvisor);
builder.setName(state.displayName);
auto compositionDisplay = getCompositionEngine().createDisplay(builder.build());
compositionDisplay->setLayerCachingEnabled(mLayerCachingEnabled);
// 创建一个用于渲染的surface,以及相关bufferqueue的producer和consumer
sp<compositionengine::DisplaySurface> displaySurface;
sp<IGraphicBufferProducer> producer;
sp<IGraphicBufferProducer> bqProducer;
sp<IGraphicBufferConsumer> bqConsumer;
getFactory().createBufferQueue(&bqProducer, &bqConsumer, /*consumerIsSurfaceFlinger =*/false);
if (state.isVirtual()) {
const auto displayId = VirtualDisplayId::tryCast(compositionDisplay->getId());
auto surface = sp<VirtualDisplaySurface>::make(getHwComposer(), *displayId, state.surface,
bqProducer, bqConsumer, state.displayName);
displaySurface = surface;
producer = std::move(surface);
} else {
const auto displayId = PhysicalDisplayId::tryCast(compositionDisplay->getId());
LOG_FATAL_IF(!displayId);
displaySurface =
sp<FramebufferSurface>::make(getHwComposer(), *displayId, bqConsumer,
state.physical->activeMode->getSize(),
ui::Size(maxGraphicsWidth, maxGraphicsHeight));
producer = bqProducer;
}
LOG_FATAL_IF(!displaySurface);
const auto display = setupNewDisplayDeviceInternal(displayToken, std::move(compositionDisplay),
state, displaySurface, producer);
mDisplays.emplace(displayToken, display);
if (!state.isVirtual()) {
dispatchDisplayHotplugEvent(display->getPhysicalId(), true);
}
// 根据硬件的size修改display以及surface的size
if (display->isPrimary()) {
mScheduler->onPrimaryDisplayAreaChanged(display->getWidth() * display->getHeight());
getRenderEngine().onPrimaryDisplaySizeChanged(display->getSize());
}
}
|
flinger->run
initScheduler完成之后就是调用SurfaceFlinger::run
 1
 2
 3
 4
 5
 6
 7
 8
 9
10
11
12
13
14
15
16
| // frameworks/native/services/surfaceflinger/SurfaceFlinger.cpp
void SurfaceFlinger::run() {
while (true) {
mEventQueue->waitMessage();
}
}
// frameworks/native/services/surfaceflinger/Scheduler/MessageQueue.cpp
void MessageQueue::waitMessage() {
do {
IPCThreadState::self()->flushCommands();
int32_t ret = mLooper->pollOnce(-1);
switch (ret) {
}
} while (true);
}
|
从这里我们可以看到,就是在等待通过Binder通信以及Messagequeue的消息传递了。
MessageQueue
我们了解了SF的启动过程,得知最后SF是进入了mq的循环。虽然这个mq不是我们熟知的Java端mq,但是两者的运行逻辑是一样的。那么接下来就是开始观察mq的运行逻辑了。
MessageQueue的创建
MessagqQueue\Looper\Handler 参考文档
 1
 2
 3
 4
 5
 6
 7
 8
 9
10
11
12
13
14
15
| // frameworks/native/services/surfaceflinger/SurfaceFlingerDefaultFactory.cpp
std::unique_ptr<MessageQueue> DefaultFactory::createMessageQueue() {
return std::make_unique<android::impl::MessageQueue>();
}
// frameworks/native/services/surfaceflinger/Scheduler/MessageQueue.cpp
void MessageQueue::init(const sp<SurfaceFlinger>& flinger) {
// SF的引用
mFlinger = flinger;
// looper 用于循环 和JAVA端的android.os.Looper 不是同一个东西,但是实现的思想是差不多的
mLooper = new Looper(true);
// MessageHandler
mHandler = new Handler(*this);
}
|
我们这里的message最主要执行的事情有refresh和invaidate。
 1
 2
 3
 4
 5
 6
 7
 8
 9
10
11
12
| void MessageQueue::Handler::handleMessage(const Message& message) {
switch (message.what) {
case INVALIDATE:
mEventMask.fetch_and(~eventMaskInvalidate);
mQueue.mFlinger->onMessageReceived(message.what, mVsyncId, mExpectedVSyncTime);
break;
case REFRESH:
mEventMask.fetch_and(~eventMaskRefresh);
mQueue.mFlinger->onMessageReceived(message.what, mVsyncId, mExpectedVSyncTime);
break;
}
}
|
我们以refresh事件来理一下messagequeue在sf中的作用
以refresh的流程来理解MQ在SF中的作用
1
2
3
4
5
6
7
8
9
10
11
12
13
14
| // frameworks/native/services/surfaceflinger/SurfaceFlinger.cpp
status_t SurfaceFlinger::onTransact(uint32_t code, const Parcel& data, Parcel* reply, uint32_t flags) {
switch (code) {
case 1006:{ // send empty update
signalRefresh();
return NO_ERROR;
}
}
}
void SurfaceFlinger::signalRefresh() {
mRefreshPending = true;
mEventQueue->refresh();
}
|
1
2
3
4
5
6
7
8
9
10
11
12
13
14
15
16
17
18
19
20
21
22
| // frameworks/native/services/surfaceflinger/Scheduler/MessageQueue.cpp
void MessageQueue::refresh() {
mHandler->dispatchRefresh();
}
void MessageQueue::Handler::dispatchRefresh() {
if ((mEventMask.fetch_or(eventMaskRefresh) & eventMaskRefresh) == 0) {
mQueue.mLooper->sendMessage(this, Message(MessageQueue::REFRESH));
}
}
// sflooper在不断的循环读取mq,所以这里会被走到,最终来到mFlinger的onMessageReceived方法,本方法在sf的主线程中运行。
void MessageQueue::Handler::handleMessage(const Message& message) {
    switch (message.what) {
        case INVALIDATE:
            mEventMask.fetch_and(~eventMaskInvalidate);
            mQueue.mFlinger->onMessageReceived(message.what, mVsyncId, mExpectedVSyncTime);
            break;
        case REFRESH:
            mEventMask.fetch_and(~eventMaskRefresh);
            mQueue.mFlinger->onMessageReceived(message.what, mVsyncId, mExpectedVSyncTime);
            break;
    }
}
|
- 第三步,SF 执行 onMessageReceived
 1
 2
 3
 4
 5
 6
 7
 8
 9
10
11
12
13
14
15
| // frameworks/native/services/surfaceflinger/SurfaceFlinger.cpp#1862
void SurfaceFlinger::onMessageReceived(int32_t what, int64_t vsyncId, nsecs_t expectedVSyncTime) {
switch (what) {
case MessageQueue::INVALIDATE: {
onMessageInvalidate(vsyncId, expectedVSyncTime);
break;
}
case MessageQueue::REFRESH: {
onMessageRefresh();
break;
}
}
}
void SurfaceFlinger::onMessageRefresh() {
}
|
VSYNC 信号的完整链路
先看图,我们再结合图一步一步的来分析信号的走势
第一步,等待HWCompser信号的回调(这一步一定会发生)
1
2
3
4
5
6
7
8
9
10
11
12
13
| // frameworks/native/services/surfaceflinger/SurfaceFlinger.cpp#1718
void SurfaceFlinger::onComposerHalVsync(hal::HWDisplayId hwcDisplayId, int64_t timestamp,
std::optional<hal::VsyncPeriodNanos> vsyncPeriod) {
// 忽略其他代码
mScheduler->addResyncSample(timestamp, vsyncPeriod, &periodFlushed);
}
// frameworks/native/services/surfaceflinger/Scheduler/Scheduler.cpp?fi=addResyncSample#addResyncSample
void Scheduler::addResyncSample(nsecs_t timestamp, std::optional<nsecs_t> hwcVsyncPeriod,
bool* periodFlushed) {
// 忽略其他代码
needsHwVsync = mVsyncSchedule.controller->addHwVsyncTimestamp(timestamp, hwcVsyncPeriod,
periodFlushed);
}
|
这里我们必须介绍一下 mScheduler 才能继续往下走了
Scheduler的前世今生
processDisplayHotplugEventsLocked
前面说到当sf第一次注册上硬件显示器的时候,会收到一个热热插拔的事件。
这个事件中,就包含了initScheduler的方法
 1
 2
 3
 4
 5
 6
 7
 8
 9
10
11
12
13
14
15
16
17
18
19
20
21
22
23
24
25
26
27
28
29
30
31
32
33
34
35
36
37
38
39
40
41
42
43
44
| void SurfaceFlinger::initScheduler(const DisplayDeviceState& displayState) {
if (mScheduler) {
// 如果当前显示器已经生产过 scheduler,那么无需再次init。initScheduler会在热插拔事件发生的时候重复调用
return;
}
// 刷新率的配置信息,里面包含了当前的屏幕刷频率,刷新周期等信息
mRefreshRateConfigs =
std::make_unique<scheduler::RefreshRateConfigs>(displayState.physical->supportedModes,
displayState.physical->activeMode
->getId(),
config);
const auto currRefreshRate = displayState.physical->activeMode->getFps();
mRefreshRateStats = std::make_unique<scheduler::RefreshRateStats>(*mTimeStats, currRefreshRate,
hal::PowerMode::OFF);
// mVsyncConfiguration 是一个 VsyncConfiguration object
// VsyncConfiguration 类中封装了不同刷新率下的VSYNC配置信息。app phase 就是vsyncSrc偏移量,sf phase 是sfVsyncSrc偏移量,
mVsyncConfiguration = getFactory().createVsyncConfiguration(currRefreshRate);
// VsyncModulator object,VSYNC调制器,根据事务调度和刷新率的变化调整VSYNC偏移量。
mVsyncModulator = sp<VsyncModulator>::make(mVsyncConfiguration->getCurrentConfigs());
// start the EventThread
// 创建Scheduler
mScheduler = getFactory().createScheduler(*mRefreshRateConfigs, *this);
const auto configs = mVsyncConfiguration->getCurrentConfigs();
const nsecs_t vsyncPeriod = currRefreshRate.getPeriodNsecs();
// 创建一个用于和应用通信 Vsync 信号 的链接
mAppConnectionHandle =
mScheduler->createConnection("app", mFrameTimeline->getTokenManager(),
/*workDuration=*/configs.late.appWorkDuration,
/*readyDuration=*/configs.late.sfWorkDuration,
impl::EventThread::InterceptVSyncsCallback());
// 创建一个用于和wms通信 Vsync 信号 的链接,主要用于驱动窗口动画等,以后不再赘述
mSfConnectionHandle =
mScheduler->createConnection("appSf", mFrameTimeline->getTokenManager(),
/*workDuration=*/std::chrono::nanoseconds(vsyncPeriod),
/*readyDuration=*/configs.late.sfWorkDuration,
[this](nsecs_t timestamp) {
mInterceptor->saveVSyncEvent(timestamp);
});
// 注册一个callback到VsyncDispatch上去,将会调用MessageQueue::vsyncCallback 方法
mEventQueue->initVsync(mScheduler->getVsyncDispatch(), *mFrameTimeline->getTokenManager(),
configs.late.sfWorkDuration);
}
|
getFactory().createScheduler()
 1
 2
 3
 4
 5
 6
 7
 8
 9
10
11
12
13
14
15
16
17
18
19
20
21
22
23
24
25
26
27
28
29
30
31
32
33
34
35
36
37
38
39
40
41
| // frameworks/native/services/surfaceflinger/SurfaceFlingerDefaultFactory.cpp
std::unique_ptr<Scheduler> DefaultFactory::createScheduler(
const scheduler::RefreshRateConfigs& configs, ISchedulerCallback& callback) {
return std::make_unique<Scheduler>(configs, callback); // 创建Scheduler对象,callback指向一个SurfaceFlinger::mFlinger
}
// /frameworks/native/services/surfaceflinger/Scheduler/Scheduler.cpp
Scheduler::Scheduler(const scheduler::RefreshRateConfigs& configs, ISchedulerCallback& callback): xxx {
}
Scheduler::Scheduler(const scheduler::RefreshRateConfigs& configs, ISchedulerCallback& callback,
Options options)
//createVsyncSchedule 很重要,创建了一个VsyncSchedule
: Scheduler(createVsyncSchedule(options.supportKernelTimer), configs, callback,
createLayerHistory(configs), options) {
...
}
Scheduler::Scheduler(VsyncSchedule schedule, const scheduler::RefreshRateConfigs& configs,
ISchedulerCallback& schedulerCallback,
std::unique_ptr<LayerHistory> layerHistory, Options options)
: mOptions(options),
mVsyncSchedule(std::move(schedule)),
mLayerHistory(std::move(layerHistory)),
mSchedulerCallback(schedulerCallback),
mRefreshRateConfigs(configs),
mPredictedVsyncTracer(
base::GetBoolProperty("debug.sf.show_predicted_vsync", false)
? std::make_unique<PredictedVsyncTracer>(*mVsyncSchedule.dispatch)
: nullptr) {
mSchedulerCallback.setVsyncEnabled(false);// 注意这里,设置了 VSync Enable False,关闭了硬件VSync
}
// frameworks/native/services/surfaceflinger/Scheduler/Scheduler.cpp#118
// 创建了一个 VSyncTracker, VSyncDispatch和 VSyncController
Scheduler::VsyncSchedule Scheduler::createVsyncSchedule(bool supportKernelTimer) {
auto tracker = createVSyncTracker();
auto dispatch = createVSyncDispatch(*tracker);
constexpr size_t pendingFenceLimit = 20;
auto controller =
std::make_unique<scheduler::VSyncReactor>(std::move(clock), *tracker, pendingFenceLimit,
supportKernelTimer);
return {std::move(controller), std::move(tracker), std::move(dispatch)};
}
|
这三个内部怎么实现有空再来了解,先看三个接口的作用。
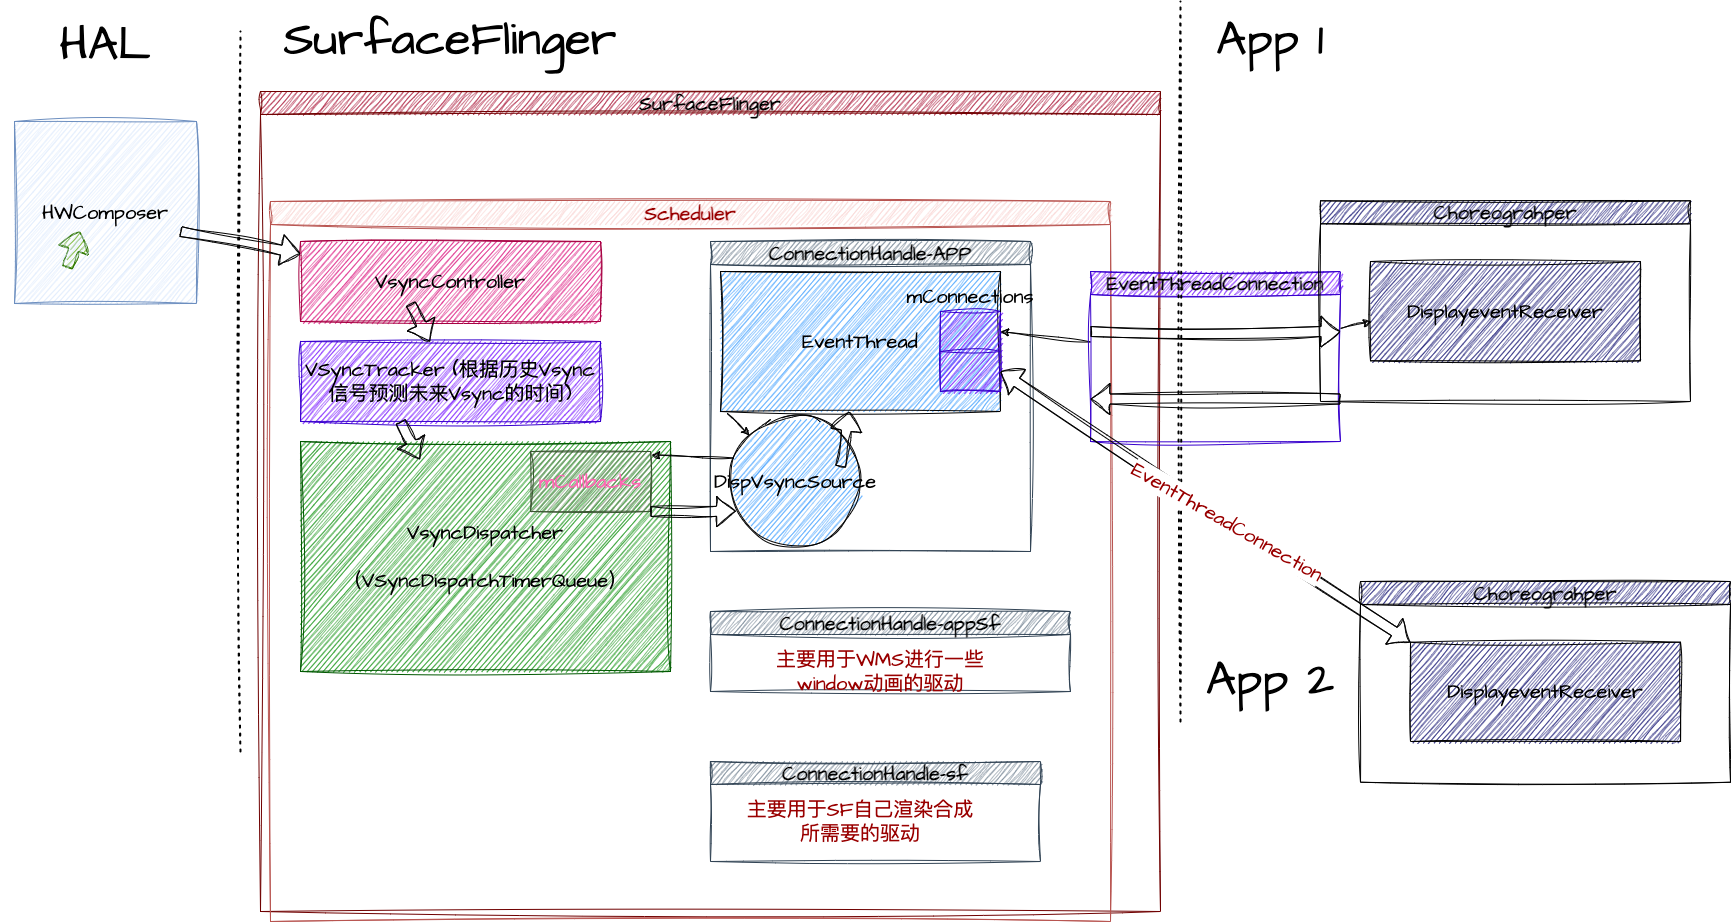
总结:
VSyncTracker:基于历史Vsync数据,对后续的Vsync信号时间进行预判。实现类为VsyncPredictor。
VSyncController:纠合各种需要的数据提供给 VSyncTracker 让其可以进行数据模型的训练。实现类为VSyncReactor。
VSyncDispatch:负责分发事件。实现类为VSyncDispatchTimerQueue。
其中 VSyncDispatchTimerQueue 负责分发VSync回调事件,需要接收VSync事件的模块可以通过registerCallback向其中注册回调函数,所有的回调都保存在了CallbackMap mCallbacks,当到了VSync发生的时间就会遍历注册的回调,把VSync事件分发出去。
我们知道,应用需要调用requestNextSync 才可以接受到下一个 Vsync信号,而这段相关逻辑就是在 VSyncDispatchTimerQueue 中实现。
VSyncDispatchTimerQueue 中的schedule方法被调用之后,会设置一个timer,到时间了才会发生回调。
mScheduler->createConnection("app", xxx)
 1
 2
 3
 4
 5
 6
 7
 8
 9
10
11
12
13
14
15
16
17
18
19
20
21
22
23
24
25
26
27
28
29
30
31
32
33
34
35
| // frameworks/native/services/surfaceflinger/Scheduler/Scheduler.cpp#118
Scheduler::ConnectionHandle Scheduler::createConnection(
const char* connectionName, frametimeline::TokenManager* tokenManager,
std::chrono::nanoseconds workDuration, std::chrono::nanoseconds readyDuration,
impl::EventThread::InterceptVSyncsCallback interceptCallback) {
// 创建一个DispSyncSource
auto vsyncSource = makePrimaryDispSyncSource(connectionName, workDuration, readyDuration);
// 创建一个EventThread
auto eventThread = std::make_unique<impl::EventThread>(std::move(vsyncSource), tokenManager,
std::move(interceptCallback),
std::move(throttleVsync),
std::move(getVsyncPeriod));
return createConnection(std::move(eventThread));
}
Scheduler::ConnectionHandle Scheduler::createConnection(std::unique_ptr<EventThread> eventThread) {
// 记录一个handle id,作为key
const ConnectionHandle handle = ConnectionHandle{mNextConnectionHandleId++};
ALOGV("Creating a connection handle with ID %" PRIuPTR, handle.id);
auto connection = createConnectionInternal(eventThread.get());
std::lock_guard<std::mutex> lock(mConnectionsLock);
// 已key-value的形式,保存在map中
mConnections.emplace(handle, Connection{connection, std::move(eventThread)});
return handle;
}
sp<EventThreadConnection> Scheduler::createConnectionInternal(
EventThread* eventThread,
// 默认参数eventRegistration = {},只处理vsync events
ISurfaceComposer::EventRegistrationFlags eventRegistration) {
//创建EventThreadConnection对象,
return eventThread->createEventConnection([&] { resync(); }, eventRegistration);
}
|
这里创建了一个DispSyncSource和EventThread,然后返回一个handlerid,根据id从mConnections 中能找到 eventThreadConnection
那么什么是 DispSyncSource ?
1
2
3
4
5
6
7
| std::unique_ptr<VSyncSource> Scheduler::makePrimaryDispSyncSource(
const char* name, std::chrono::nanoseconds workDuration,
std::chrono::nanoseconds readyDuration, bool traceVsync) {
// mVsyncSchedule.dispatch 就是在Scheduler创建时,创建的VSyncDispatchTimerQueue对象
return std::make_unique<scheduler::DispSyncSource>(*mVsyncSchedule.dispatch, workDuration,
readyDuration, traceVsync, name);
}
|
具体代码就不看了,具体的内容就是将vsync的信号包装起来,作为一个信号源,向VsyncDispatch发送周期性的vsync信号。内部作了信号的延迟。
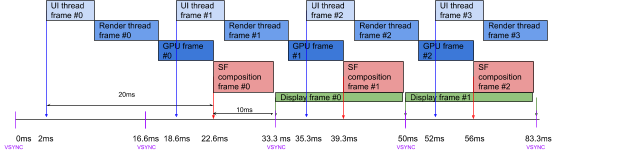 Android上进行高频率渲染
而最后Vsync会发送到EventThread上去。
 1
 2
 3
 4
 5
 6
 7
 8
 9
10
11
12
13
14
15
16
17
18
19
20
21
22
23
24
25
26
27
28
29
30
31
32
33
34
35
36
37
38
39
40
41
42
| // frameworks/native/services/surfaceflinger/Scheduler/EventThread.cpp#403
void EventThread::onVSyncEvent(nsecs_t timestamp, nsecs_t expectedVSyncTimestamp,
nsecs_t deadlineTimestamp) {
std::lock_guard<std::mutex> lock(mMutex);
LOG_FATAL_IF(!mVSyncState);
const int64_t vsyncId = [&] {
if (mTokenManager != nullptr) {
return mTokenManager->generateTokenForPredictions(
{timestamp, deadlineTimestamp, expectedVSyncTimestamp});
}
return FrameTimelineInfo::INVALID_VSYNC_ID;
}();
mPendingEvents.push_back(makeVSync(mVSyncState->displayId, timestamp, ++mVSyncState->count,
expectedVSyncTimestamp, deadlineTimestamp, vsyncId));
mCondition.notify_all();
}
EventThread::EventThread(std::unique_ptr<VSyncSource> vsyncSource,
android::frametimeline::TokenManager* tokenManager,
InterceptVSyncsCallback interceptVSyncsCallback,
ThrottleVsyncCallback throttleVsyncCallback,
GetVsyncPeriodFunction getVsyncPeriodFunction)
: mVSyncSource(std::move(vsyncSource)), // 保存 DispVSyncSource 对象
mTokenManager(tokenManager),
mInterceptVSyncsCallback(std::move(interceptVSyncsCallback)),
mThrottleVsyncCallback(std::move(throttleVsyncCallback)),
mGetVsyncPeriodFunction(std::move(getVsyncPeriodFunction)),
mThreadName(mVSyncSource->getName()) {
LOG_ALWAYS_FATAL_IF(getVsyncPeriodFunction == nullptr,
"getVsyncPeriodFunction must not be null");
mVSyncSource->setCallback(this); // 为 DispVSyncSource 设置回调
// 开启新线程,执行threadMain
mThread = std::thread([this]() NO_THREAD_SAFETY_ANALYSIS {
std::unique_lock<std::mutex> lock(mMutex);
threadMain(lock);
});
...
}
|
DispSyncSource 回调到EventThread::onVSyncEvent。EventThread创建一个Parcelable的VSync数据包加入mPendingEvents,然后通知thread唤醒threadMain 从mPendingEvents取出信号发给关注者,然后在阻塞自己等待下一个信号
mEventQueue->initVsync
先看下具体的代码
1
2
| mEventQueue->initVsync(mScheduler->getVsyncDispatch(), *mFrameTimeline->getTokenManager(),
configs.late.sfWorkDuration);
|
再关注下initVsync
1
2
3
4
5
6
7
8
9
10
11
12
13
14
| // frameworks/native/services/surfaceflinger/Scheduler/MessageQueue.cpp
void MessageQueue::initVsync(scheduler::VSyncDispatch& dispatch,
frametimeline::TokenManager& tokenManager,
std::chrono::nanoseconds workDuration) {
setDuration(workDuration);// mVsync.scheduled初始为false, setDuration中只是保存mVsync.workDuration = workDuration;
mVsync.tokenManager = &tokenManager;
mVsync.registration = std::make_unique<
scheduler::VSyncCallbackRegistration>(dispatch, // 向 VSyncDispatch 中注册回调,绑定到 MessageQueue::vsyncCallback
std::bind(&MessageQueue::vsyncCallback, this,
std::placeholders::_1,
std::placeholders::_2,
std::placeholders::_3),
"sf");
}
|
向VsyncDispatch 注册了回调,这里是用于SF自己需要的VSync信号周期。
第二步,VsyncSchedule内部传递
controller接受信号,tracker内部的数据模型进行分析和预测,dispatch内部定时根据需要定时分发。
第三步,DispSyncSource接受dispatch的回调
创建一个信号源,添加偏移值发送EventThread。
其他具体的略,之后补充。
第四步,通过连接发送给app
通过bittube发送sync的数据给app端。这一步是怎么实现的?我们需要具体讲讲
app如何与SF建立连接
choreographer app端的详细内容可以查看这一部分。
从上面的文章我们可以看到app端和sf建立连接用的是DispalyEventDispatcher。
app端发起连接请求
我们跳过java端的代码直接进入native代码
 1
 2
 3
 4
 5
 6
 7
 8
 9
10
11
12
13
14
15
16
17
18
19
20
21
22
23
24
25
26
27
28
29
30
31
32
33
34
35
36
37
38
| // frameworks/native/libs/gui/DisplayEventReceiver.cpp#35
DisplayEventReceiver::DisplayEventReceiver(
ISurfaceComposer::VsyncSource vsyncSource,
ISurfaceComposer::EventRegistrationFlags eventRegistration) {
// 这个sf 就是surfaceflinger的binder client端
sp<ISurfaceComposer> sf(ComposerService::getComposerService());
if (sf != nullptr) {
// 调用sf的createDisplayEventConnection 方法
mEventConnection = sf->createDisplayEventConnection(vsyncSource, eventRegistration);
if (mEventConnection != nullptr) {
mDataChannel = std::make_unique<gui::BitTube>();
mEventConnection->stealReceiveChannel(mDataChannel.get());
}
}
}
// frameworks/native/services/surfaceflinger/SurfaceFlinger.cpp#createDisplayEventConnection
sp<IDisplayEventConnection> SurfaceFlinger::createDisplayEventConnection(
ISurfaceComposer::VsyncSource vsyncSource,
ISurfaceComposer::EventRegistrationFlags eventRegistration) {
const auto& handle =
vsyncSource == eVsyncSourceSurfaceFlinger ? mSfConnectionHandle : mAppConnectionHandle;
return mScheduler->createDisplayEventConnection(handle, eventRegistration);
}
// frameworks/native/services/surfaceflinger/Scheduler/EventThread.cpp?fi=createEventConnection#EventThreadConnection
sp<EventThreadConnection> EventThread::createEventConnection(
ResyncCallback resyncCallback,
ISurfaceComposer::EventRegistrationFlags eventRegistration) const {
return new EventThreadConnection(const_cast<EventThread*>(this),
IPCThreadState::self()->getCallingUid(),
std::move(resyncCallback), eventRegistration);
}
status_t EventThreadConnection::stealReceiveChannel(gui::BitTube* outChannel) {
outChannel->setReceiveFd(mChannel.moveReceiveFd());
outChannel->setSendFd(base::unique_fd(dup(mChannel.getSendFd())));
return NO_ERROR;
}
|
从这里我们可以看到,EventThreadConnection 创建了一个全双工的通道,
BitTube
SurfaceFlinger的内容到此为止。
参考资料